Project Overview:
This project was designed to help us learn about heat, thermodynamics, alternate energy, and daylighting techniques. There were several parts to the project: atomic structure, solar water heater, solar house design, materials testing, wind turbine (VAWT and HAWT) design, alternate energy justification, coldframe design, and our north window plans.
Atomic Structure:
To learn about how heat works we had to first learn about atomic structure. Atoms are made of three parts: protons, neutrons, and electrons. Protons are the second heaviest of the subatomic particles. They have a positive charge and determine what element an atom is. Electrons are the lightest particle by far, they have a negative charge and 'orbit' the protons and neutrons. They don't actually orbit the nucleus, they just quantum teleport around. Don't think about it too hard. Neutrons are the heaviest particle (barely). It does not have a charge. The only important thing about them (in a high school class) is that they make elements have different isotopes, e.g. carbon 14.
Solar Water Heater:
Designing a solar water heater was the first part of our project. This experiment helped us learn about heat transfers such as conduction and radiation. Conduction is the transfer of heat through a solid material, and radiation is the transfer of heat through waves.
We were given several materials to make our solar water heater:
1 meter of copper piping
1 shoebox
1 roll of masking tape
2 feet^2 of saran wrap
3 feet^2 of aluminum foil
1 meter of plastic tubing
1 propel water bottle
6 huge cotton balls
The basic building process of our heater was as follows:
Step 1: Cut top and one side off.
Step 2: Cover inside of the box with aluminum foil.
Step 3: Cut holes in two sides of shoebox.
Step 4: Slide piping through and bend it to maximize surface area inside of box.
Step 5: Cover box with saran wrap.
Step 6: Attach tube to piping and bottom of water bottle.
Step 7: Elevate water bottle.
Step 8: Insulate water bottle with cotton balls.
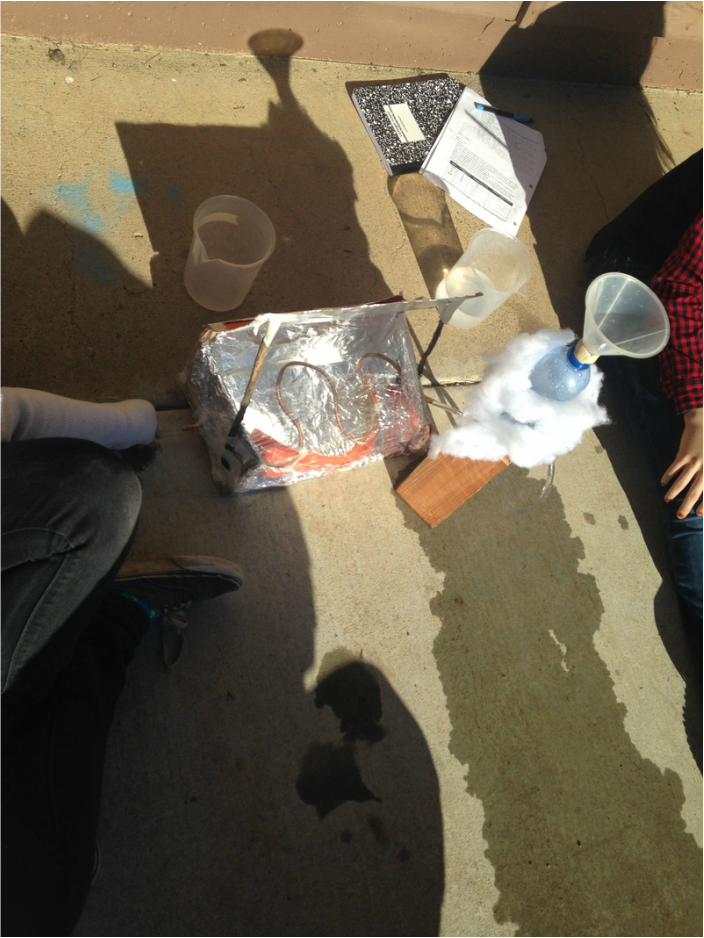
To operate the heater we had to place it in the sun, fill the water bottle up, let the water run through and be heated, then use a cup to fill the water bottle again. This works because the radiation travels through the air into the box, and it reflected onto the pipe, which heats up and conducts heat into the water.
Testing Day:
When we tested our water heater, we quickly realized that we had a huge flaw: our design was not watertight. Throughout the twenty minutes of testing we ended up losing eighty-five percent of our water. However, the fifteen percent of water remaining ended up increasing temperature from 19 degrees Celsius to 32 degrees Celsius. If we hadn't lost any water, than we probably would have ended up with about two or three degrees Celsius of temperature gain.
This project was designed to help us learn about heat, thermodynamics, alternate energy, and daylighting techniques. There were several parts to the project: atomic structure, solar water heater, solar house design, materials testing, wind turbine (VAWT and HAWT) design, alternate energy justification, coldframe design, and our north window plans.
Atomic Structure:
To learn about how heat works we had to first learn about atomic structure. Atoms are made of three parts: protons, neutrons, and electrons. Protons are the second heaviest of the subatomic particles. They have a positive charge and determine what element an atom is. Electrons are the lightest particle by far, they have a negative charge and 'orbit' the protons and neutrons. They don't actually orbit the nucleus, they just quantum teleport around. Don't think about it too hard. Neutrons are the heaviest particle (barely). It does not have a charge. The only important thing about them (in a high school class) is that they make elements have different isotopes, e.g. carbon 14.
Solar Water Heater:
Designing a solar water heater was the first part of our project. This experiment helped us learn about heat transfers such as conduction and radiation. Conduction is the transfer of heat through a solid material, and radiation is the transfer of heat through waves.
We were given several materials to make our solar water heater:
1 meter of copper piping
1 shoebox
1 roll of masking tape
2 feet^2 of saran wrap
3 feet^2 of aluminum foil
1 meter of plastic tubing
1 propel water bottle
6 huge cotton balls
The basic building process of our heater was as follows:
Step 1: Cut top and one side off.
Step 2: Cover inside of the box with aluminum foil.
Step 3: Cut holes in two sides of shoebox.
Step 4: Slide piping through and bend it to maximize surface area inside of box.
Step 5: Cover box with saran wrap.
Step 6: Attach tube to piping and bottom of water bottle.
Step 7: Elevate water bottle.
Step 8: Insulate water bottle with cotton balls.
To operate the heater we had to place it in the sun, fill the water bottle up, let the water run through and be heated, then use a cup to fill the water bottle again. This works because the radiation travels through the air into the box, and it reflected onto the pipe, which heats up and conducts heat into the water.
Testing Day:
When we tested our water heater, we quickly realized that we had a huge flaw: our design was not watertight. Throughout the twenty minutes of testing we ended up losing eighty-five percent of our water. However, the fifteen percent of water remaining ended up increasing temperature from 19 degrees Celsius to 32 degrees Celsius. If we hadn't lost any water, than we probably would have ended up with about two or three degrees Celsius of temperature gain.
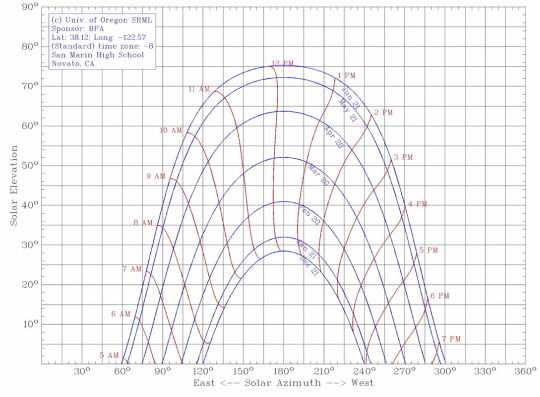
Solar Angles and Sun's Movement:
An important part of building a solar house is understanding how the sun moves through the sky at different times of day and during different seasons. Due to the earth's 23.5 degree tilt, the sun rises higher during the summer, and lower during the winter. The sun also rises higher nearer the equator then it does near the poles. In the northern hemisphere the sun always appears to be in the South. This data helps us maximize the amount of light that we get for our house by putting the clerestory windows and light shelves on the southern side of our house.
An important part of building a solar house is understanding how the sun moves through the sky at different times of day and during different seasons. Due to the earth's 23.5 degree tilt, the sun rises higher during the summer, and lower during the winter. The sun also rises higher nearer the equator then it does near the poles. In the northern hemisphere the sun always appears to be in the South. This data helps us maximize the amount of light that we get for our house by putting the clerestory windows and light shelves on the southern side of our house.
Daylighting House:
For this part of our project we designed a house that minimized electricity use by using daylighting techniques instead of artificial light. Before we started making our model we had to learn what daylighting even was.
(Sorry for copying Wikipedia definitions, but my computer restarted itself and I lost all the defintions I had made. These are better anyways though.)
Clerestory Window: In architecture, clerestory (/ˈklɪərstɔri/; lit. clear storey, also clearstory, clearstorey, or overstorey) are any high windows above eye level. The purpose is admit light, fresh air, or both.
Light Shelf: A light shelf is a horizontal surface that reflects daylight deep into a building. Light shelves are placed above eye-level and have high-reflectance upper surfaces, which reflect daylight onto the ceiling and deeper into the space.
Skylight: Skylights are light transmitting fenestration (elements filling building envelope openings) forming all, or a portion of, the roof of a building's space for daylighting purposes.
Solar Tubes: Solar tubes or solar pipes are physical structures used for transporting or distributing natural or artificial light for the purpose of illumination, and are examples of optical waveguides.
Using these daylighting elements our team of expert architects designed this beauty:
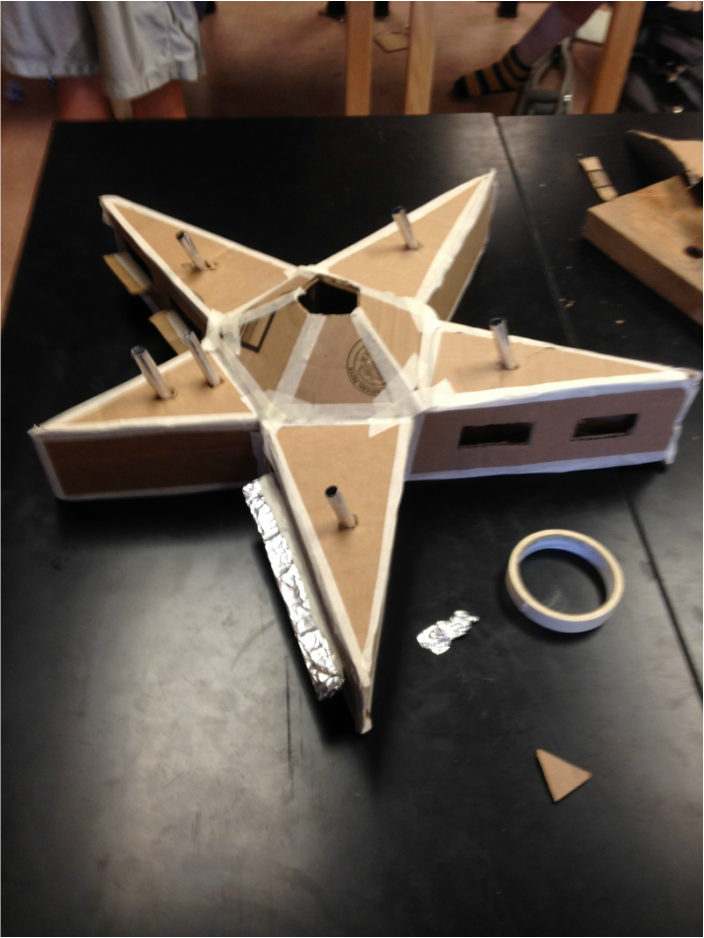
This design performed surprisingly well. The light shelves and clerestory windows definitely helped illuminate the house, however the solar tubes and skylight definitely underperformed. The skylight did work when the sun was high up, but the solar tubes never worked. This is most likely because we made them out of aluminum foil, not real solar tube materials.
Site selection:
The last part of this daylighting extravaganza was site selection. We were assigned the task of finding a good spot to build our solar house. My group evaluated three sites based on their noise levels, lighting, privacy, visibility, accessibility, temperature, and view. The results were clear that the grassy area near the Spanish buildings was the best location we could find. It was accessible, well lit, quiet, had an average temperature, and had a nice view. The only major downside was that there was not much privacy, but the pros outweighed that con. Second place was a spot on the hill next to Novato Boulevard, and third was an area near the baseball field. Unfortunately I could not find any pictures of these locations.
Materials Testing:
This lab was designed so that we would learn how different materials interact with heat. These interactions include conduction, insulation, reflection, and absorbing heat. My group tested all of the transparent materials (single layer saran wrap, double layer saran wrap, and glass). The lab is below.
This lab was designed so that we would learn how different materials interact with heat. These interactions include conduction, insulation, reflection, and absorbing heat. My group tested all of the transparent materials (single layer saran wrap, double layer saran wrap, and glass). The lab is below.
Although the results of this lab were mostly inconclusive, we still learned that when you do a lab you have to make sure that you control all of the variables, not just most of them.
Wind Turbine Lab:
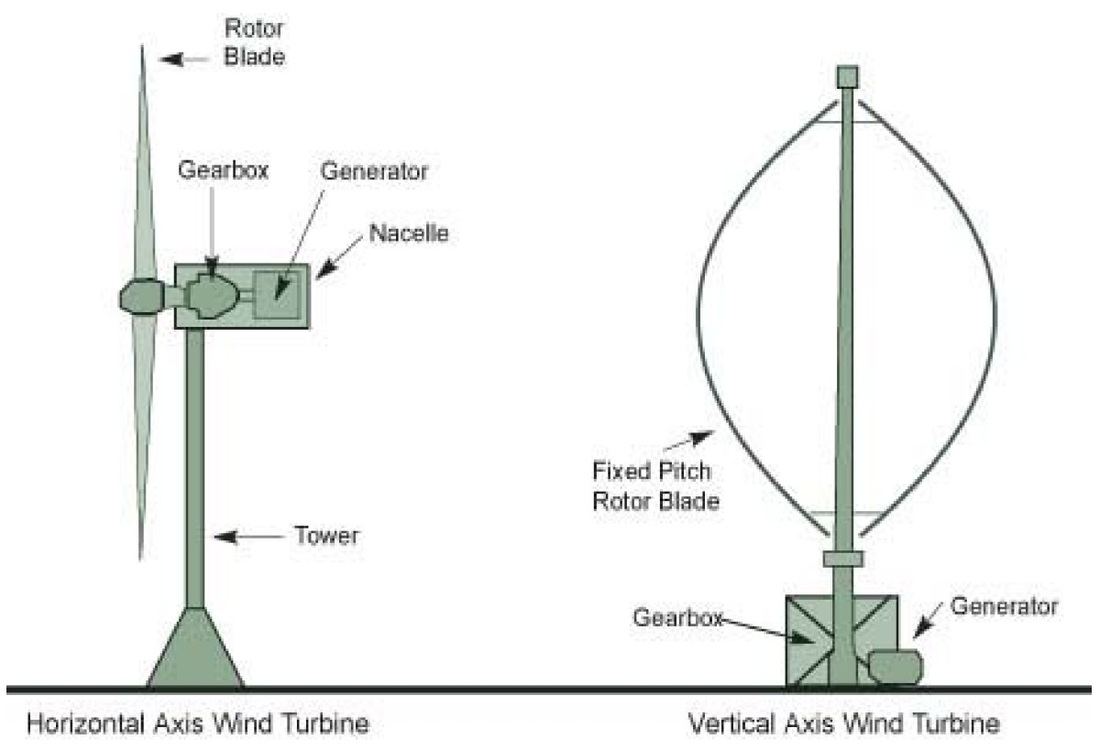
The point of this lab was to learn about alternate energy sources. Current energy sources such as natural gas and petroleum are relatively cheap and readily available (for now), but they are damaging to the environment and are non renewable. Solar power is a great option, however it is not always practical. This is where wind energy comes in. Wind can be converted into energy by using VAWTS (vertical axis wind turbines) and HAWTS (horizontal axis wind turbines). HAWTS are more common, since as they are more efficient and can be taller, where wind is faster. VAWTS do have the advantage of not killing as many birds and not ruining the view though.
Wind turbines work the opposite way that fans do. The wind turns the blades, which spin a shaft, which connects to a generator and makes electricity. The turbines that our class made worked exactly the same way, we just used a fan to turn the blades instead of wind.
My group decided to use manila folders and wooden Tinker Toy rods to make our wind turbines. We decided to make cores of our own instead of using the Tinker Toy cores. This way we could have lighter turbines, which would work better in light wind.
We decided to have three blades on our HAWT because that is what full-scale ones have, so it is probably the best ratio. We made the blades by cutting out elliptical sections of manila folders and taping them to the Tinker Toy rods. Then we attached them in our makeshift core using masking tape. Our group was working pretty slowly though, so our VAWT was pretty similar to our HAWT. The main difference was the angles of the blades. The HAWT had 45 degree angle blades and the VAWT had 90 degree blades.
When we tested our HAWT we got 0.6 volts on low power, 0.8 volts on medium power, and 1.1 volts on high power. The low power results were actually not too bad, probably because of the light weight, but the higher speed results were not very good. This is probably because our blades were not very high quality. The VAWT we designed was not very good. At low power it produced .25 volts, at medium power it produced 0.4 volts, and at high power it broke. The bad results were probably because much of the wind energy was pushing the blades in the opposite direction that they were supposed to be going.
Justification Paper:
In this task, our class created a group document to help us understand why we were doing all of this. The document outlined types of energy, energy consumption and waste, greenhouse gases, and climate change, to name a few things. It helped us understand why the issues of climate change and the energy crisis are so important.
You can find our justification paper here.
Cold frame Design:
Cold frames are boxes that go over plants and keep them warm in the winter. This is important because many plants freeze and die in the winter. Coldframes also extend the growing seasons of many plants. The STEM program was tasked by the garden club to make three cold frames to keep their plants from freezing.
My group came up with a large trapezoidal design. The idea behind this design is that many plants would be able to fit inside, and that sunlight would be reflected off of the aluminum sheet metal onto the plants. Our presentation can be seen below.
North Window Plan:
Last year's STEM class built a solar studio using daylighting techniques when they did this project. One part of their design was a reflector panel that would redirect light into a window on the north facing side of the building. Unfortunately, the reflector panel was stolen, so this year's class had to come up with a plan to make the north window more useful.
Most groups decided to design a new reflector panel. My group decided to go with a simpler design: curtains. Installing curtains would be far cheaper and easier than making a reflector panel. The curtains would also be far less likely to be damaged or stolen. Curtains are also more aesthetically pleasing than a reflector panel. Curtains would prevent light from coming in through one window and going out the other. Curtains would also create more of a diffuse light and less of a specular (shiny) light. There are many advantages to using curtains instead of a reflector, but unfortunately our presentation did not convince the judges of this.
Concepts:
Heat - energy in a transfer
Temperature - a comparative measure of hot and cold
0th law of thermodynamics - If two thermodynamic systems are each in thermal equilibrium with a third, then they are in thermal equilibrium with each other.
1st law of thermodynamics - matter and energy are conserved
2nd law of thermodynamics - entropy always increases
3rd law of thermodynamics - absolute zero is unattainable
Conduction - transfer of heat through solids
Convection - transfer of heat through fluid
Radiation - transfer of heat through waves
Specific heat - the quantity of required to raise the temperature of a unit mass of a substance by one degree Celsius
Pressure - force over an area
Ideal gas law - any change in internal energy results in a change in temperature. PV = nRT
Boyle's law - pressure and volume are indirectly related. P1 * V1 = P2 * V2
Bernoulli's principle - Fluid pressure decreases as pressure increases
Archimedes principle - an immersed object is buoyed up by as force equal to the weight of its displaced fluid
Insulation - inability to transfer heat
Solid - state of matter with very little particle movement
Liquid - state of matter that can flow but not float
Gas - state of matter which can flow and float
Buoyancy - weight of water from displacement
Reflection:
Our passive solar home project went . . . very poorly. I am not exaggerating when I say that all of the previous projects' pits combined do not touch this one's. I think there are many contributing factors to this dismal proclamation. For starters our group procrastinated. A lot. With deadlines that seemed so far away it was often difficult to motivate. This lead to very bad planning, and a worse final product. Another problem was two group members spent most of the time doing nothing. Out of say, 15 hours of work time, Tony and Isabella probably only put in five hours each. Marslina and I probably put in 10 hours each. Another problem that I had (I can't speak for anyone else) was that I had a hard time getting in the right mindset about the latter part of the project. For all of the other projects I really wanted to turn out a great final project, but for this one I did not get "in the groove". I think it was because I was far more interested in the game engine I have been designing.
One of the biggest takeaways from this project was that I have to try my best even if I am not thrilled with my circumstances. I am sure that I will have work-projects that I won't be excited about, but my employer is going to expect me to turn out my best work either way. I also learned how bad serious procrastination is. Usually I do not procrastinate very much, but this time I gave in. This website update should stand as a reminder of what happens when you procrastinate. I have had dozens of opportunities over the last ten weeks to work on it, but instead I am doing it all today.
I did learn a lot from this project. I learned how to make good blueprints, I learned what NOT to do in a presentation, I learned about time management, I learned about work ethic, and I learned more about group dynamics. This might have been my worst project this year, but it was also the best learning experience.
Lastly, peaks and pits.
Peaks:
My group had an awesome daylighting house. I think making a star-house was really creative, and our model turned out really well, both in terms of lighting and aesthetics.
We definitely stepped up our effort at the end of the project, and had decent presentations at presentation night.
I definitely learned a lot from this project, content wise and project management wise.
Pits:
I already said several pits, but I will recap.
We procrastinated far too much.
I didn't try my hardest.
Our group did not coordinate well - all four group members rarely worked simultaneously.
